How to Trim Dog Nails at Home Without Cutting the Quick
Step-by-step nail trimming guide for dogs. Learn how to find the quick, use the right tools, and handle a dog that hates nail trims — without a vet visit.
Alex Corsa
Founder & Editor ·
📖 Table of Contents
Affiliate Disclosure: As an Amazon Associate, we earn from qualifying purchases. This comes at no extra cost to you and helps support our independent testing and reviews. We only recommend products we genuinely believe in.
Medically reviewed by Dr. Sarah Mitchell, DVM, DVM
Licensed veterinarian. This article has been reviewed for medical accuracy.
Dog nails need trimming roughly every 3–4 weeks. Most dogs hate it. Most owners avoid it. The result is nails that have grown long enough to alter gait, cause joint discomfort, and click loudly on every hard floor in your house.
The good news: nail trimming is a learnable skill, and once you understand where the quick is and how to desensitize your dog to the process, it becomes a 5-minute routine rather than a wrestling match.
TL;DR: Use sharp clippers, trim small amounts frequently (every 2–3 weeks) rather than large amounts rarely, and go slowly with dogs that have had a bad experience. If your dog has black nails, look for the chalky white dot in the cross-section of each cut to know how close you are to the quick.
Why Long Nails Are a Real Health Problem
It is easy to treat overgrown nails as a cosmetic issue. They are not.
When nails touch the ground, they push the dog’s toe joints upward with each step. Over time, this changes how weight is distributed across the paw, which puts stress up the leg and can contribute to joint pain — particularly in older dogs already dealing with arthritis. Long nails also break more easily, and a torn nail is genuinely painful and sometimes requires veterinary attention.
The goal: nails that do not touch the ground when the dog stands on a flat surface. If you hear clicking on hardwood floors, the nails are too long.
Tools You Need
The clippers: Two main types work for home use:
- Guillotine style: A hole that the nail slides through; a blade drops when squeezed. Better for smaller nails, simple to use, but requires blade replacement when dull.
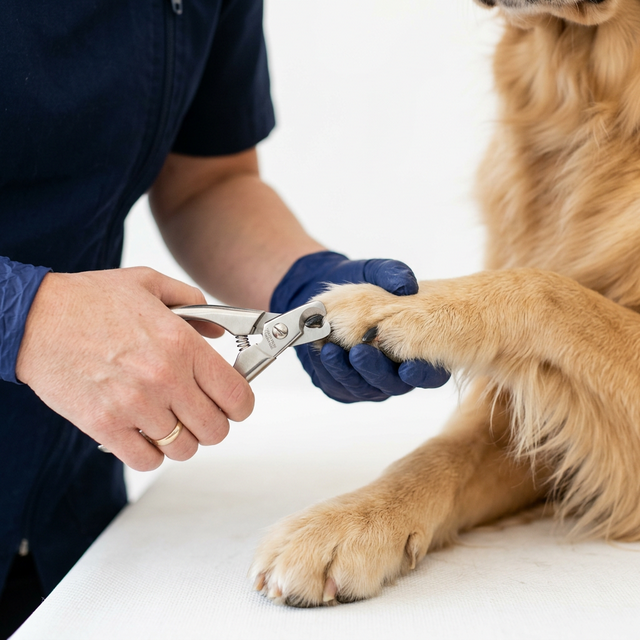
- Scissor/plier style: Cuts like scissors from both sides simultaneously. Better for larger, thicker nails. Most professional groomers prefer this style for its control.
Avoid cheap clippers. Dull blades crush the nail rather than cutting cleanly, which hurts the dog and increases resistance. A quality pair of clippers lasts years with blade replacement.
Styptic powder: Keeps it accessible whenever you trim. If you cut the quick, styptic powder (or cornstarch in an emergency) stops bleeding in under a minute. Kwik-Stop is the most common brand.
Treats: High-value treats for counter-conditioning. This is not optional.
Optional — a Dremel or nail grinder: Some dogs tolerate grinding better than clipping. Grinders gradually sand down the nail rather than cutting, making it harder to hit the quick. The noise and vibration are a separate desensitization project, but for dogs that panic at clippers, it can be worth it.
Understanding the Quick
The quick is the bundle of blood vessels and nerve tissue that runs through the center of each nail. Cutting into it causes immediate bleeding and pain — which is why dogs that have been quicked in the past often become difficult for nail trimming.
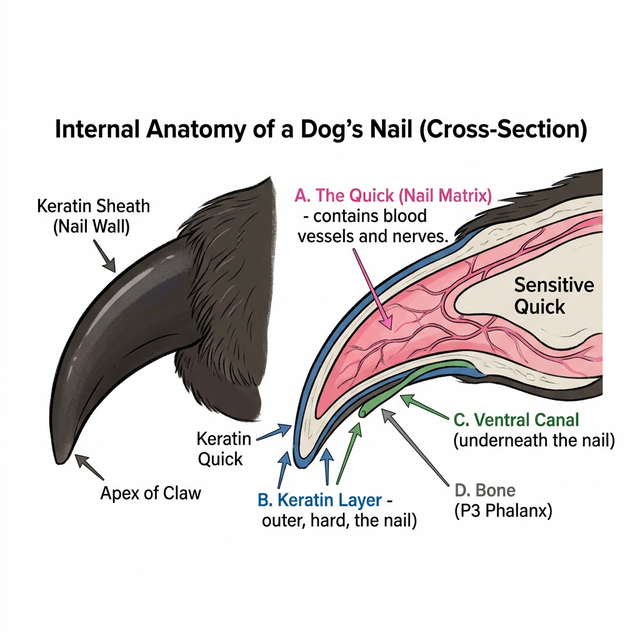 The quick runs through the center of every nail — pink and visible in white nails, invisible from the outside in black nails.
For white or clear nails: You can see the quick as a pink line running through the center of the nail. Stop well before the pink begins.
For black nails: You cannot see the quick from the outside. Instead, cut small amounts and examine the cross-section of each cut:
- The first cuts will show a white or crumbly chalky center — you are in the dead nail material, keep going
- As you approach the quick, the center turns from white to a dark grey or black spot with a glossy appearance
- When you see that dark oval in the center, stop — you are one small cut away from the quick
Trim in thin cross-sections (1–2 mm) for black nails, not large chunks, to maintain control and avoid overcutting.
The Trimming Process, Step by Step
Before You Start
- Have treats within arm’s reach before picking up the clippers
- Let your dog sniff the clippers and reward for calm behavior
- Choose a time when your dog is relaxed (after a walk, not before dinnertime)
- Good lighting — preferably holding the paw up to a lamp or sunlit window
The Cut
Scissor-style clippers give better control for larger breeds — hold the paw firmly and cut in one decisive motion.
Positioning: Have your dog sit or lie down. For smaller dogs, place them on a non-slip surface to prevent scrambling. For large dogs, many people find it easier to have the dog lie on their side — this gives good control without looking threatening.
Hold the paw firmly but gently: Use your non-dominant hand to hold the paw. Grip the individual toe firmly enough that it doesn’t wiggle, but don’t squeeze hard enough to cause discomfort.
For the cut itself:
- Position the clipper perpendicular to the nail (cutting straight across, not at a sharp angle)
- Place the blade just below where you’ve identified the quick will be
- Squeeze in one smooth, decisive motion — hesitation causes crushing more than cutting
- Check the cross-section before the next cut
The rear dew claw: Some dogs have rear dew claws that never touch the ground and grow in a curve. These need more frequent attention because they can curl back into the skin. Check every 2–3 weeks.
What to Do If You Cut the Quick
Don’t panic — your dog will take cues from you. Quick cuts happen to every dog owner and to professional groomers. Here’s the response:
- Apply styptic powder directly to the bleeding nail tip and hold for 30–60 seconds
- Keep the dog from licking the paw for a few minutes while the coagulant sets
- Speak calmly; don’t apologize dramatically, as this escalates the dog’s stress response
- If bleeding doesn’t stop in 5 minutes with styptic powder, contact your vet
One quick cut does not ruin your dog’s relationship with nail trimming as long as you proceed calmly and reward them afterward. Multiple bad experiences without recovery do.
Desensitizing a Dog That Hates Nail Trims
If your dog runs when they see the clippers and requires three people to hold them still, you have a desensitization project before a nail trimming project. Rushing through a traumatic session and then waiting 4 weeks to repeat it is the slowest possible approach.
The Desensitization Protocol
Start weeks before you actually need to trim. Go through these stages, spending a few days at each level before moving to the next:
-
Clipper exposure: Set the clippers on the floor near your dog’s food bowl. No touching, just presence. Feed treats near them.
-
Handling the paw: Pick up each paw, hold for 1 second, treat. Work up to 5 seconds. Practice daily.
-
Clippers touching paw: Hold the closed clippers against each nail without cutting. Treat. Repeat until the dog is relaxed.
-
Sound association: Open and close the clippers near the paw without touching. The sound is often more startling than the cut itself.
-
One nail: Trim one nail and stop. Reward heavily. End of session.
-
Build to full trim: Add one nail per session until you can do all four paws in one sitting.
This process takes 2–4 weeks for a mildly resistant dog. For a dog with a severe history of bad experiences, 1–2 months. It is worth it.
Frequency and the “Quick Recession” Principle
Trim every 2–3 weeks rather than every 6–8 weeks. More frequent trimming gives you the opportunity to train the quick to recede.
Here is the principle: if nails go a long time between trims, the quick grows forward to fill the available nail length. This means you can only take a little off before hitting the quick, and the nails stay long even after trimming.
If you trim frequently, the quick receives a signal that it doesn’t need to extend as far — over several weeks, it will recede back toward the paw, allowing progressively shorter nail trims. Dogs that walk frequently on pavement naturally wear their nails down, which has the same effect.
Frequently Asked Questions
How do I know if my dog’s nails are too long?
If you can hear clicking on hardwood floors, they are too long. Nails should not touch the ground when the dog is standing flat on a level surface. When you look at the paw from the side, nails should have a slight downward curve but clear the ground.
What if I can’t get my dog to hold still?
Some dogs need a helper to hold them gently for nail trims. For extreme resistance, ask your vet for a “happy visit” — a visit specifically to practice desensitization without any medical procedures. Many vets also offer nail trims during wellness visits. Some dogs benefit from a portable grooming hammock that supports their body weight during the trim.
Can I use a regular Dremel for dog nails?
A regular Dremel works, but pet-specific nail grinders have lower RPM and smaller grit appropriate for dog nails. Standard Dremels can overheat the nail if held in place too long. If using a standard Dremel, use the lowest speed setting and keep moving.
How far back should I trim black nails?
Trim in 1–2 mm slices and check the cross-section of each cut. Stop when you see a dark oval in the center of the nail. As a rough guide, if you can fit a piece of paper between the nail tip and the floor when your dog stands, the nails probably aren’t too long yet.
You Might Also Like

Alex Corsa
Founder & Editor
Alex Corsa has owned and fostered dogs for over 12 years, with hands-on experience caring for everything from senior mastiffs to reactive rescues and brachycephalic breeds. He started DogSupplyFinder after spending two frustrating years testing gear that failed, broke, or simply didn't work as advertised. Every recommendation on this site has been vetted against real-world use — not affiliate commission rates. Alex cross-references veterinary guidelines and AAFCO regulations for all food and health content.
Dog Tips, Deals & Gear Guides
Expert buying guides, breed-specific product picks, and honest gear reviews. Plus our free New Puppy Checklist for subscribers.
📬 No spam, ever. Unsubscribe anytime. · Get the free puppy checklist